

Apr, 2025
Page Object Model Selenium: Learn Web Automation with Java and TestNG

- Talib Hussain
SHARE THIS
Introduction
In this guide, we’ll walk through everything you need to know about Selenium automation, from setting up your environment to writing your first test script. We’ll also introduce the Page Object Model Selenium approach to help you build scalable and maintainable test frameworks.What is Selenium?
Selenium is the most popular web browser automation tool. It works with several operating systems, including Windows, Mac, and Linux, and browsers, including Chrome, Firefox, Internet Explorer, and Safari. Selenium also supports C#, Java, JavaScript, Ruby, Python, and PHP programming languages.Components of Selenium:
There are four major components of Selenium, each with a different purpose.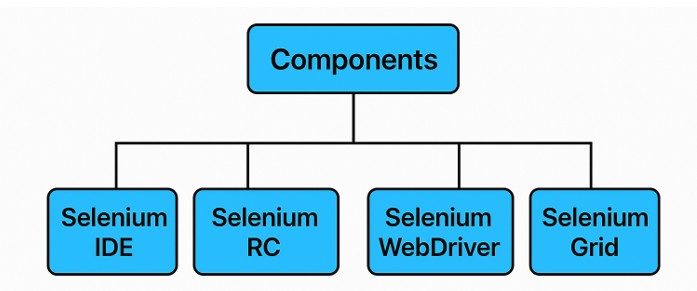
Selenium IDE:
Selenium IDE, abbreviated as Selenium Integrated Development Environment, is a browser plugin for Chrome and Firefox. It is a record-and-play tool that captures all the actions on the browser and then creates reusable scripts against those actions in different languages, such as Python, Java, JavaScript, and C#.Selenium RC:
Selenium RC, formerly Selenium Remote Control, is no longer in use. Because of its limitations and complicated architecture, Selenium WebDriver has replaced it. Selenium RC’s two primary parts are the server and client libraries. It was merged with Selenium 2, and the currently running version is Selenium.
Selenium WebDriver:
It is an important component of Selenium, which automates web applications. It supports several web browsers, such as Safari, Chrome, Firefox, and Internet Explorer. Selenium WebDriver is easy to understand and use because of its simple and basic commands. Users can easily interact with the web elements to perform required actions and assertions.Selenium Grid:
Selenium Grid is a distribution system for the parallel execution of test cases on various browsers and operating systems altogether. Selenium Grid is available in three different modes: fully distributed, hub & node, and standalone. Since Selenium Grid supports parallel testing, the execution of test suites is way faster.Why Selenium?
Since we have now understood what selenium is. Let’s go over some benefits of the Selenium WebDriver.Benefits of Selenium WebDriver:
- Open Source: Being an open-source web automation tool is one of Selenium WebDriver’s main benefits.
- Supports Multiple Browsers: It supports several browsers, including Firefox, Safari, Chrome, and Internet Explorer.
- Multi-Language Support: Language support is the primary obstacle that a tester or developer encounters with the automation tool. Selenium is easy to use because it supports all main languages, including JavaScript, Python, Java, Ruby, C#, Perl, .Net, and PHP.
- Supports Multiple OS: Selenium supports multiple OS, such as Windows, Mac, Linux, Unix, etc., making it more flexible.
- Community Support: Selenium has one of the largest active open community support that can assist you in resolving any problems you may have.
Selenium has many advantages, but it also has some disadvantages. Before integrating any tool into your project, learning its flaws/ drawbacks is wise. Let’s review some drawbacks of Selenium WebDriver.
Drawbacks of Selenium WebDriver:
- The Selenium WebDriver does not support Parallel Testing. For parallel testing, you will have to use Selenium Grid.
- It doesn’t support the automation of desktop applications.
- With Selenium WebDriver, automating QR codes and Captcha is impossible. You must use external paid libraries to automate Captcha or QA code.
- It doesn’t have any built-in reporting mechanism. You will have to use external libraries for reporting, which are free to use.
How Does Selenium WebDriver Work?
Working with Selenium WebDriver varies between Selenium 3 and Selenium 4. Since Selenium 4 is the updated version and is currently being used, let’s see how it works. Selenium 4 has a similar design to Selenium 3, except it communicates between Client Libraries and Browser Drivers using the W3C protocol rather than the JSON wire protocol. As a result, Selenium 4’s WebDriver is 100% W3C compliant! The WebDriver protocol allows test scripts to communicate directly with browser drivers (binaries). The elimination of the JSON Wire protocol has eased communication between client libraries and browser drivers.Getting Started with Web Automation Using Selenium WebDriver
In the above sections, we have learned about Selenium in detail and discussed its advantages and disadvantages. We will now go through step-by-step instructions on how to start web automation testing using Selenium WebDriver and Java as a programming language.JDK Installation
In the above sections, we have learned about Selenium in detail and discussed its advantages and disadvantages. We will now go through step-by-step instructions on how to start web automation testing using Selenium WebDriver and Java as a programming language.
JDK stands for Java Development Kit. Since we will use Java with Selenium WebDriver, we will learn how to install and configure Java on our system.
- You must download and install the JDK file from the Java official website based on your OS specifications.
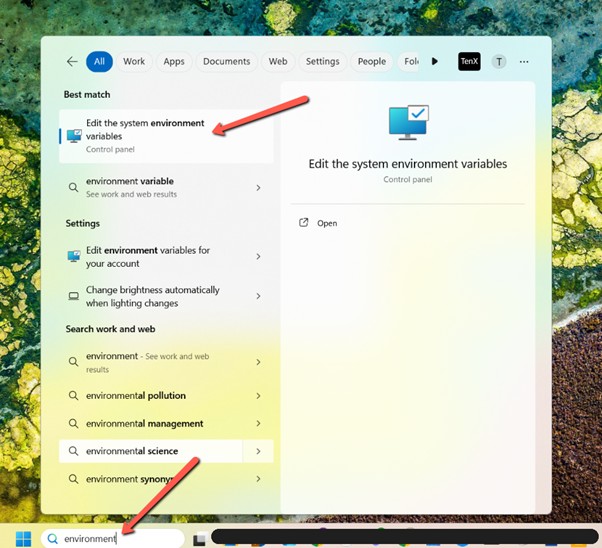
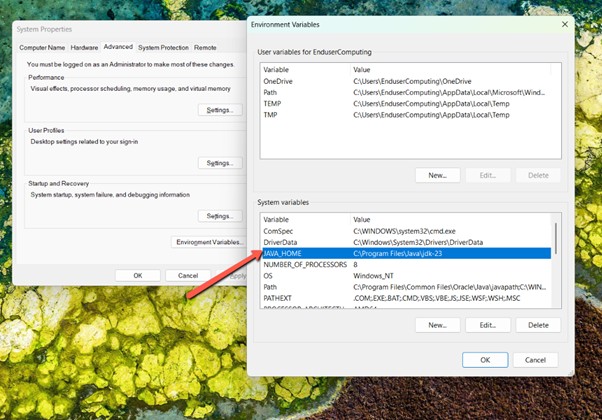
- After installing, ensure you have all environment variables, i.e., path and Java Home, as shown in the images below.
a. Navigate to the Edit the System Environment Variables window by searching for environment variables in the Windows search box.
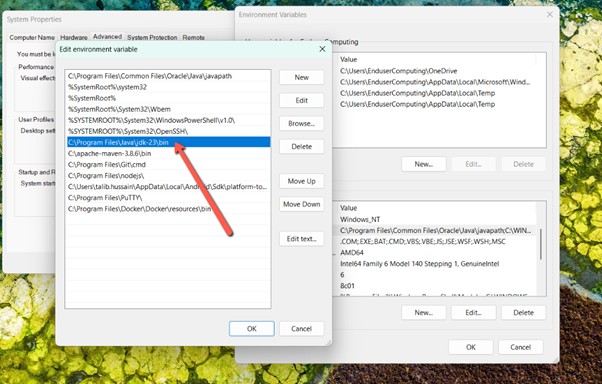
b. Click environment variables and edit the path variable displayed under the system variables section.

c. Now copy the bin path where your Java is installed. Paste the copied path and save it..
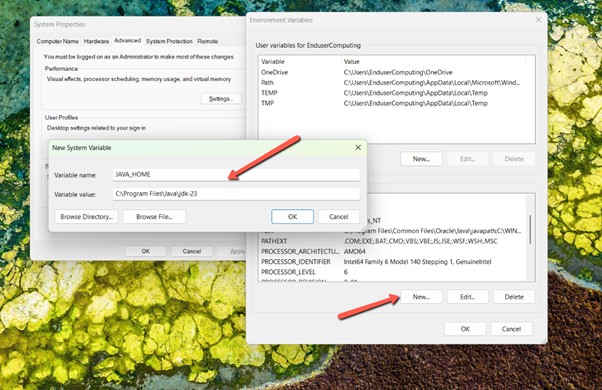
d. The last step is to add a new variable named JAVA_HOME, copy/paste the path where Java is installed, and save it as shown in below images.
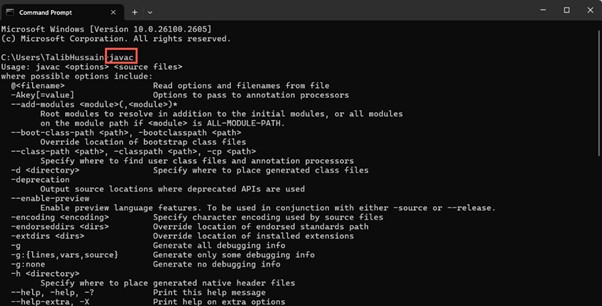
3. Now open the cmd and type javac to validate the installation success. To check the version of Java installed, use the java -version

IDE Installation:
IDE is referred to as Integrated Development Environment. Once Java has been installed and configured successfully, it’s time to install the IDE. We will install the IntelliJ IDE provided by JetBrains. Currently, there are many IDEs on the market; you can install any of them.
- Download and install IntelliJ from JetBrains’ official website.
- Make sure you download and install the community edition, which is free and has everything you need to start. The ultimate edition is a paid one with a 30-day trial period.
Creating My First Project
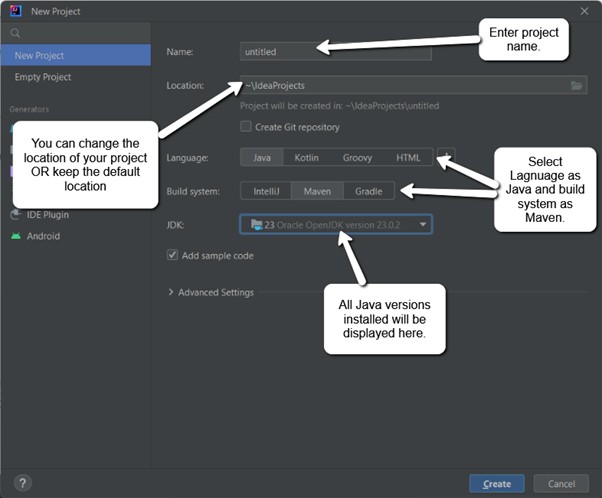
- Launch IntelliJ IDE. We can create a new project or clone the existing project from VCS (Version Control System). We will start with a fresh project. Go to File -> New -> New Java Project.
- A new pop-up window will appear.
- Enter your project name.
- You can choose or alter the project’s creation location. If you don’t select a location, it will set the default location under Idea Projects.
- Select the programming language as Java.
- Select the build system as Maven, as it is one of the best tools for project management.
- Finally, you can select the installed JDK version and click the Create button to create the project.
Setting up a Project for Selenium:
We have successfully created the project. Now, we will set up Selenium and other required libraries required for web automation in our project.
Since we are using the Maven architecture, the project dependencies will be defined in the pom.xml file. In Maven, a dependency is an archive file (such as a JAR, ZIP, etc.) that your project requires to compile, build, test, and execute.
How To Add Dependencies:
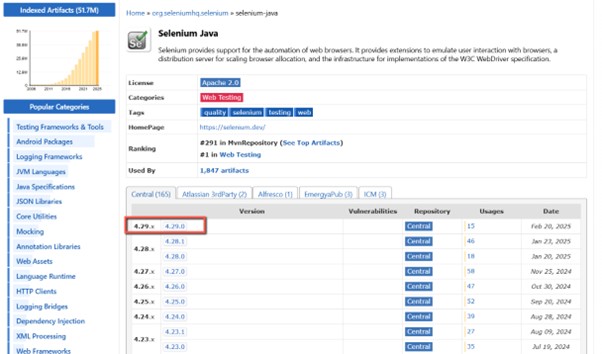
- You can find all the dependencies on the Maven official site. Search for the dependency you are looking for, like we search for Selenium Java and select it.
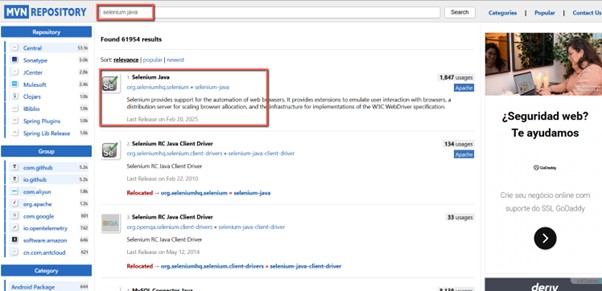
- Once selected, you will get all the versions of Selenium Java. You can also select the oldest versions. But we will select the updated version i.e., 4.29.
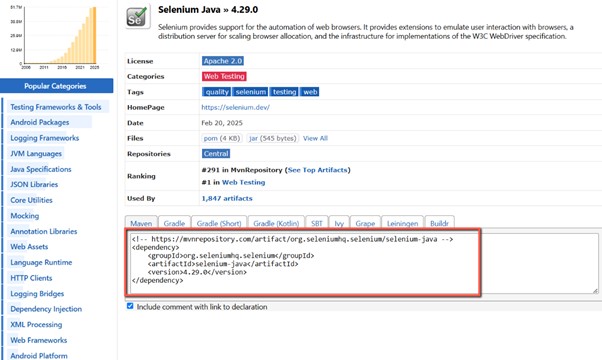
- Once selected, you will see the dependency details. You will notice that we have other options, such as Gradle, Kotlin, etc. Since we are working with Maven, we will go with Maven. Copy the dependency for Maven.
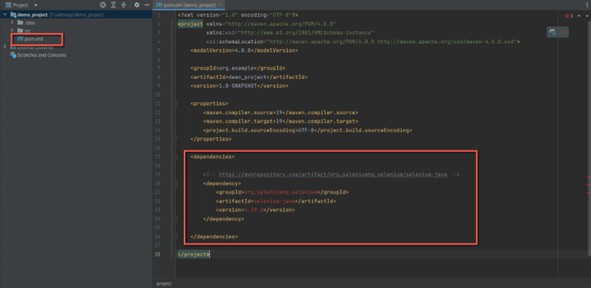
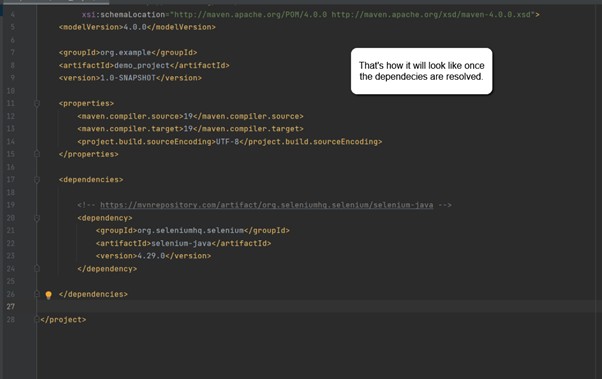
- Now, come back to your project in IntelliJ and open the pom.xml file. We will add all our dependencies under the dependencies tag shown in the image below. Paste your copied dependency under the dependencies tag.
- The dependency added is shown in red, which means there is an error. There is no need to worry about it. Whenever a new dependency is added, the Maven project should be reloaded to make changes to it. You can reload it in two ways, as shown in the attached images below.
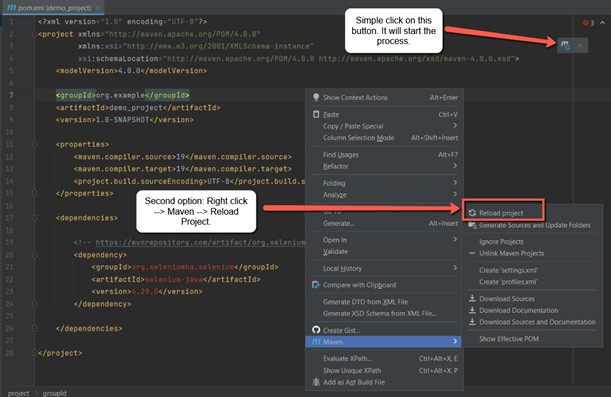
- The process will begin and may take time to resolve dependencies. Once it is completed, there will be no errors, and you are good to go.
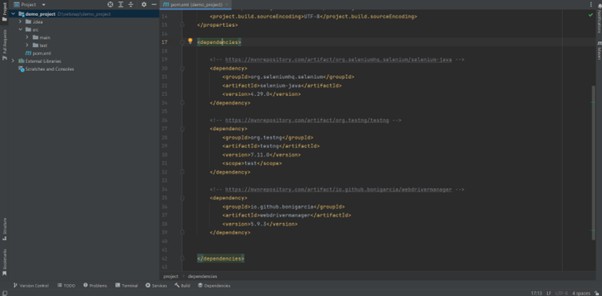
Which Dependencies to Add for the Selenium Java Automation Project
In the above section, we have seen how one can add a dependency to the project. Currently, we can add many dependencies based on our requirements, but in this section, we will discuss and add some basic dependencies to our project.
- Selenium Java: It’s required for our web automation using Selenium.
- TestNG: A framework used for automation testing in Java. This robust tool covers all types of tests, including unit, functional, and integration.
- WebDriver Manager: It is unnecessary, but it can make your life easier if used. It auto-downloads the browser driver based on your operating system and browser version.
- Other Dependencies: You can add more dependencies, such as logging, reporting, and extent reports, based on your needs. At the moment, we will go with the basic ones that are required for our project to get started.
Here is an example of what dependencies we have added to our project.
Implementing Page Object Model Selenium in Your Test Framework
The Page Object Model Selenium design pattern is a widely accepted framework structure used in automation testing. It enhances test maintenance and reduces code duplication by separating test scripts from page-specific code. Each web page is represented as a class, and the elements on the page are defined as variables. This allows you to easily maintain or scale your test cases as the application evolves.
My First Test Script Using Selenium:
I have discussed web automation with Selenium, installing Java and IDEA, creating your first project, and installing Selenium and other required libraries. Now, we’re ready to write our first Selenium Java test script.
The following problem statement demonstrates how to execute a Selenium script for web automation.
- Launch the Chrome Browser.
- Navigate to google.com.
- Input Selenium in the search bar and press Enter.
- Close the browser.
Implementation:
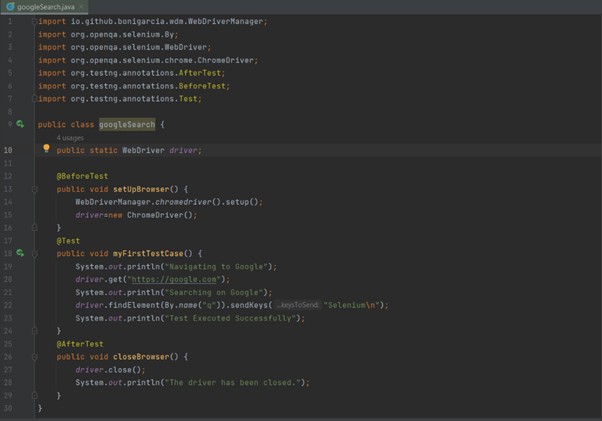
Let’s go through the implementation of the above mentioned test case.
Although the above example shows everything in a single test class, as your project grows, it’s recommended that you adopt a design pattern like Page Object Model Selenium for better organization. This helps keep your test logic and UI interactions separate.
Explanation of the above code snippet:
Let’s go through the above code snippet line by line.
- Code Lines 12 to 16: In the setUpBrowser method, we set and initialize the browser. It will launch the Chrome browser.
- The @BeforeTest annotation in TestNG ensures the function is executed before any other @Test annotations. We mainly use @BeforeTest annotation for the pre-requisite.
- Here is the line: ChromeDriver.setup sets up the system’s most recent Chrome Browser.
- However, it is feasible to initialize the browser version as well.
- Code Lines 17 to 24: Our actual test case is this.
- @Test annotation is used to signify that the method is a Test Method.
- get is used to launch the specific URL.
- findElement is used to locate the element. There are multiple ways to locate the element, i.e., using xpath, id, css selector, link text, name, etc. We are using the name locator to locate the element. I will write an article, especially about locators. Stay Tuned!
- Once the element is captured, you can perform actions on it. sendKeys is used to input the text in an input field.
- To perform a click action, we simply use .click once the element has been captured/located, which is similar to .sendKeys.
- Code Lines 25 to 29: We’re closing the browser once our tests have been executed.
- @AfterTest is another TestNG annotation, which means that the method with this annotation will be executed after the method with the @Test annotation is executed. We can write commands to help end the process, such as closing the files and browsers.
- close closes the currently active browser session, and if there are multiple browsers, you can use the driver.quit to close all sessions.
We are using the name locator to locate the element. Later, if your application under test grows complex, following Page Object Model Selenium allows you to reuse locators and actions efficiently across different test cases.
Now, we must execute the test case. There are multiple ways to do so.
- If you are looking to execute the specific class, you can either start the execution using the play button displayed on top or you can execute it using the right click, as mentioned below.
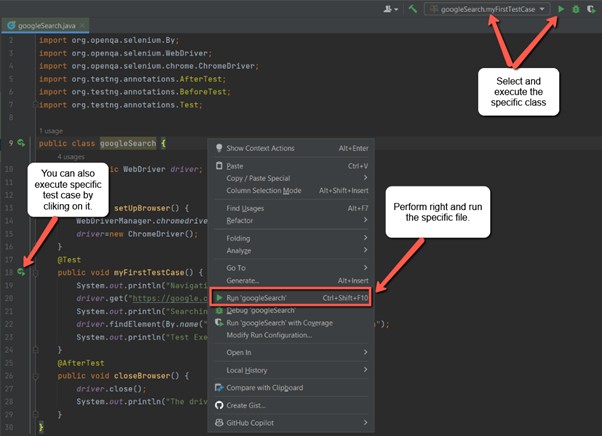
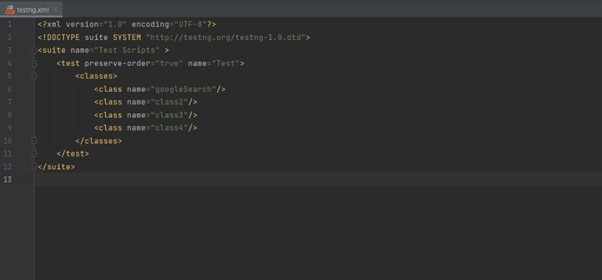
- The above method of executing the test cases is acceptable when you want to execute a single class or when you can execute a specific class. However, if you want to execute multiple classes, the above method is not flexible and suitable. So, to execute multiple classes, we will create and execute the .xml file shown in the image below.
Execution Reports and Results:
Once the tests have been executed, it’s time to see the results.
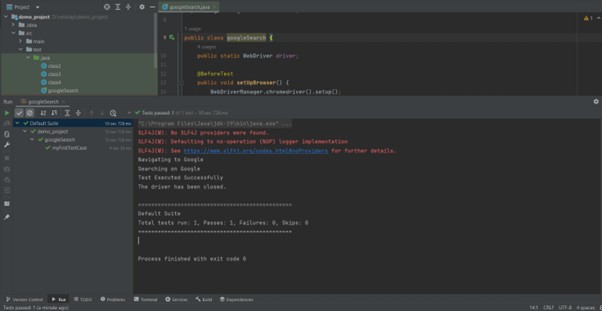
Results through Console:
You can check the desired results on the console where your tests were executed. You can view a complete report of your executed tests.
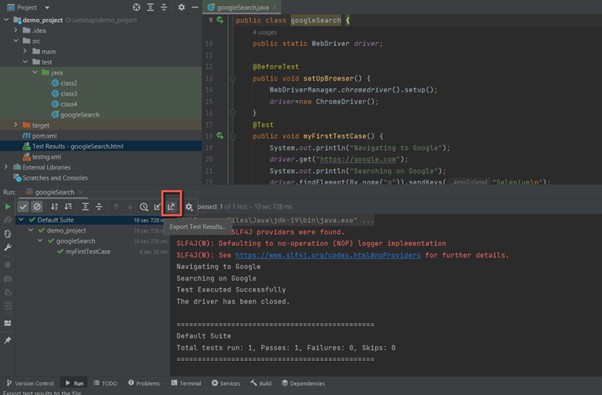
Default HTML Reports:
You can see your results in HTML format. That’s a default reporting provided by TestNG and IntelliJ. The reports are auto-generated after every execution and you only have to export the results. Export and view the results in your browser.
Adopting best practices like Page Object Model Selenium can make your framework more robust, maintainable, and scalable as you continue building your test suite. It’s especially beneficial when working in a team or managing a large set of automated tests.
Read more
Numerous reports are accessible for review and subsequent reporting. Usually, third-party reporting libraries, such as Allure, Extent, etc., are used as they are detail-oriented and provide an interactive HTML UI for better visualization and insights, including logs, screenshots, execution time, and statuses. Moreover, these reports can also be customized, allowing you to add details like test metadata, browser version, etc. We will go over more about these reports in our next postings. So far, you can practice creating test scripts using the TestNG framework.

Talib Hussain
Talib Hussain works as a Senior SQA Automation Engineer at TenX

