

Introduction
Businesses now generate vast amounts of data, and storing and managing that data safely and securely is essential. Data lakes have emerged as an efficient way to manage large volumes of data. Data lake provides a scalable platform for storing and processing data of any kind, size, or format. However, data lakes are not immune to disasters, and when they occur, they can cause severe damage to the organization. This blog will discuss the disaster recovery of data lake ecosystems and how organizations can employ a methodology to ensure their data lake environments are resilient.
Disaster Recovery for Hadoop Data Lake
Cloudera is widely recognized for its role in building and managing Hadoop-based data lakes, which serve as centralized repositories for storing and analyzing vast amounts of structured and unstructured data. Cloudera’s comprehensive platform and ecosystem offer numerous components and features that facilitate the efficient implementation of data lakes.
However, even with these solutions, there remains a risk of disasters affecting the data lake environment. Disasters can arise from various sources, including natural disasters, cyber-attacks, hardware failures, and human errors. Such events can have a significant impact on a business, leading to downtime, data loss, and financial setbacks. Hence, it becomes crucial to establish a robust disaster recovery plan to ensure uninterrupted business operations.
The most effective approach for disaster recovery systems involves setting up a complete replica of the production server at different geographical locations. This system not only provides protection against natural disasters but also maintains business continuity in the event of cyber-attacks or hardware failures by shifting the workload to a designated disaster recovery system.
One critical aspect provided by Cloudera is its built-in solutions for metadata backup and synchronization between primary and secondary (Disaster Recovery) servers, ensuring disaster recovery capabilities. It also offers a user-friendly graphical interface for managing and monitoring these disaster recovery setups.
However, managing the licensing costs for two cluster setups can be quite expensive, particularly considering that a cluster can consist of multiple nodes. The pricing for such a configuration and support can amount to approximately $10,000 USD per node per year. As a result, larger organizations that can afford Cloudera’s CDP have adopted these solutions, while smaller ones often opt for on-premises open-source alternatives.
One such open-source data lake solution comprises Apache Hadoop, which includes a cold storage Distributed File System called HDFS same as the Cloudera Data Platform. HDFS is specifically designed for storing large volumes of infrequently accessed data while optimizing costs for long-term data retention. Data is stored in HDFS files and compressed using codecs like gzip or Snappy to minimize storage space. The data is then moved to lower-cost storage tiers, such as slower disks, while still ensuring accessibility and reliability for future analysis or reference. But this solution doesn’t exist for metadata and data synchronization.
Implementing a disaster recovery solution using open-source tools such as Apache Hadoop, Postgres SQL, Ambari, Hive, and other Big-Data related services, combined with a data synchronization mechanism, plays a vital role in achieving shorter Recovery Time Object (RTO) and Recovery Point Object (RPO) for financially constrained FinTech firms. This article focuses on the importance of data replication and synchronization using open-source tools to overcome these challenges. The following steps outline the implementation process.
- Understanding the Environment Specification.
- Tracing Hive Meta-store.
- Taking a Backup of the Hive meta-store and moving that to the target Cluster.
- Editing Hive Meta-store’s server configurations in the backup file.
- Restoring Hive Meta-store at Target Cluster.
- Synchronizing Schemas and Data.
- References.
Understanding The Environment Specification
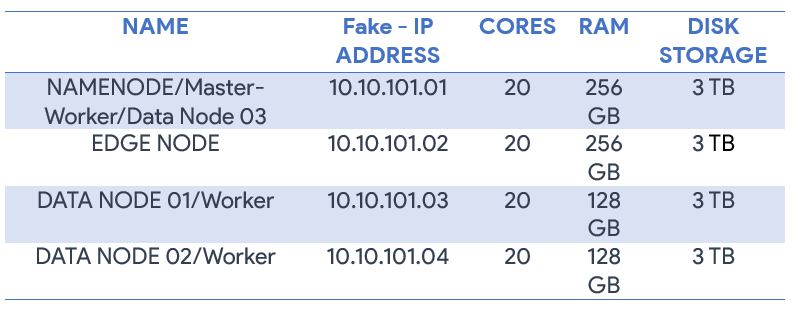
Hardware Specification
Hardware specifications are just for reference you can opt according to business requirements.
Software Specification
Linux
Red Hat Enterprise Linux 07 is an open-source operating system and is compatible with different Apache big data tools.
Ambari
Ambari 2.1 Management Console: Apache Ambari is an open-source management platform for provisioning, managing, and monitoring Apache Hadoop clusters. It provides a web-based interface for managing and monitoring Hadoop services such as HDFS, YARN, MapReduce2, Hive, and others.
With Ambari, administrators can easily install, configure, and manage Hadoop services and components on a cluster of machines. It provides a centralized view of the cluster’s health and status, which enables administrators to quickly identify and resolve issues. Ambari also provides features for automating common Hadoop tasks, such as creating and deploying cluster configurations, managing service and component versions, and configuring security policies.
Hive
Hive provides a SQL-like interface called HiveQL, which allows users to write queries that are translated into MapReduce jobs that can be executed on a Hadoop cluster. HiveQL supports a wide range of SQL-like commands, including SELECT, JOIN, GROUP BY, and ORDER BY. Hive also provides a meta store, which stores metadata about the data stored in HDFS and helps optimize queries.
PostgreSQL
PostgreSQL is a powerful open-source object-relational database management system (ORDBMS) that runs on all major operating systems, including Windows, Linux, and macOS.
PostgreSQL is a good choice for storing metadata due to its flexibility, scalability, and reliability. It supports a wide range of data types and data models, including structured and unstructured data, making it suitable for storing a variety of metadata. Additionally, PostgreSQL’s support for custom functions and data types allows users to define their own metadata models and access methods. PostgreSQL also provides high availability and replication features, ensuring that metadata remains available and consistent even in the event of hardware or network failures.
Yarn
YARN (Yet Another Resource Negotiator) is a resource management platform in Apache Hadoop that allows multiple data processing engines, such as MapReduce, Apache Spark, and Apache Hive, to run on a single Hadoop cluster.
YARN separates the resource management and job scheduling functions of Hadoop’s previous MapReduce processing engine, allowing Hadoop to support a wider range of processing engines. It provides a central platform for managing resources, scheduling jobs, and monitoring progress, making it easier to manage and optimize the use of computing resources in a Hadoop cluster.
Overall, YARN has significantly improved the flexibility and performance of Hadoop by allowing multiple processing engines to run on a single cluster. Its resource management and scheduling capabilities make it easier to manage and optimize the use of computing resources in a Hadoop cluster, making it a critical component of many big data processing pipelines.
Tez
Apache Tez is an open-source framework for building high-performance batch and interactive data processing applications on top of Hadoop. It is designed to improve the efficiency and speed of data processing. Tez is a key component of the Hadoop ecosystem and is used by several big data processing platforms.
Tracing Hive Meta-store
Hive Meta store is a centralized repository that stores metadata information about the data stored in Hadoop Distributed File System (HDFS). It provides a schema for the data stored in HDFS, making it easier for users to query and analyze large datasets using Hive.
To synchronize both clusters (source and DR), we need to know on which database exactly the hive meta-store is deployed on the source cluster. To check this, go to Ambari UI of Source Cluster and then go to hive, configs, and databases. The correct path would be “Ambari UI > hive > configs > Databases”. In this case, Postgres SQL was used to store the meta-store for HIVE.
Taking a dump of Hive meta-store and moving it to DR Cluster.
Hive meta store Dump.
A dump of a meta store typically refers to a backup of the metadata repository for a database or data warehouse system. It contains information about the schema, tables, views, indexes, and other objects stored in the system.
To take a dump of your Hive Meta-store you need to log in to your cluster with the same user you created the database and make sure that the user has all the necessary permissions to the directories you will be using for taking backup.
We will use the “hive” User and its Home Directory to take backups. To take a backup use the following Command.
COMMAND: pg_dump hive > /home/hive/hive_metastore_backups/hive_bck1
Where pg_dump is the command, the hive is the database command > /home/hive/hive_metastore_backups/ is the path where the backup file would be placed and hive_bck1 will be the name of your backup file.
Moving it to DR-Cluster
To move the Hive Meta-store backup of the source cluster to the target (DR) Cluster we’ll be using simple SCP command of Linux Red hat. Following is the command to move the backup.
COMMAND: scp -r user@source_IP-address:<source-path><filename> user@target_IP-address:<destination-path>
Where scp is the command to move the following paths and files to different nodes,
parameter -r is used to copy recursively,
xyz@000.000.0.00: is the IP address of the source node along with user xyz,
<source-path> is the path where the backup file is placed and
<filename> is the name of the Hive meta-store backup file we need to move.
Similarly, abc@000.000.0.00:<target-path> is the IP address of the DR-cluster along with the user abc and its path where we need to place our Hive meta-store backup.
Editing Hive Meta-store’s server configurations in the backup file.
As we’ve placed the hive meta-store backup file of Source-Cluster onto DR-Cluster, it will now replicate all its schemas and DDL of source-Cluster to DR-Cluster on restoring it. But first, we need to change all the name nodes and host names of the source to the target ones in the <filename> dump file, which would somewhat look like this “hdfs://ip-address-old-name node:<port>” in our case its “hdfs://abc:8020” and we need to replace it to target node’s name which is “hdfs://xyz:8020”, to restore it to target Cluster.
There would be more than thousands of cases you must find and replace, to accomplish this you can use the GREP command of Linux to find and take count of the instances you must replace. Then, you can use the SED command to replace it at once.
GREP Command
The GREP command can be used to find sentences in a file. Use the command grep then the pattern you want to search and the filename at the end. In our case, the command will be as follows:
COMMAND: grep hdfs://<ip-address>:<port> <filename>
You can use the -c parameter of the grep command to take a count of the pattern match.
COMMAND: grep -c hdfs:// <ip-address>:<port> <filename>
SED Command
The SED command instantly finds and replaces all the matched instances with a string of words. SED is basically an editor and we’ll be using one of its functionalities to find and replace the name of nodes.
COMMAND: sed -i ‘s/words to be searched/words to be replaced/g’ file name
In our case, the Command will be as follow.
COMMAND: sed -i ‘s/<source-domain-name>:8020/<destination-domain-name>:8020/g’ file-name
Where sed is the editor we are using to find and replace the strings, -i is to save the file after replacing it, s/<source-domain-name>:8020 is the name of the source cluster and which we want to find from the file, destination-domain-name:8020/g’ is the name of the DR cluster, which we want to replace within the file and file-name is the name of the file in which we’ll be changing the names of the servers.
Restoring Hive Meta-store at Target Cluster
Before we proceed to restore the hive meta-store to the DR cluster, we need to ensure some parameters. First, we need to make sure all the hive services are turned off at the DR cluster. Second, the database you are using for the hive meta-store must be the same as used in the source cluster, in our case it is Postgres. Third, you must drop the database and create a new one with the same name at the DR cluster, which you configured for maintaining the meta-store at the time of configuring Ambari and hive, in our case, it’s the HIVE database in Postgres. And in the Last, run the restoring command.
Turning Hive services off
It is necessary to turn off all the Hive services before restoring the Hive meta store to prevent data inconsistency and corruption. Hive is a data warehousing tool that allows users to store and analyze large datasets in Hadoop. Hive uses metadata stored in the Hive meta store (PostgreSQL) to provide a schema for data stored in HDFS. When you restore a meta store, the metadata stored in the Hive meta store can become out of sync with the data stored in HDFS, leading to data inconsistency and corruption. Once the meta store restoration is complete, you can restart the Hive services and update the Hive to reflect the changes.
To turn down all the hive services, we’ll use Ambari UI. Go to the Ambari UI of the DR cluster and open the hive dashboard from the left panel. Stop all the services from the action drop-down menu and place them at the right top side of the dashboard. The Proper path would be: Ambari UI > Hive > Actions > Stop.
Drop Hive database
Dropping the database must be logged in from the same user you created. In our case it is HIVE, we will be accessing Postgres from a Hive user and then drop the database. To enter Postgres, use the following command.
COMMAND: su – postgres
and then type: psql
Now that we are in Postgres, we must check the list of already existing databases by giving the following command.
COMMAND: \l
And to Drop the database run the command given below.
COMMAND: DROP DATABASE hive;
to make sure it is deleted, check the list of existing databases again.
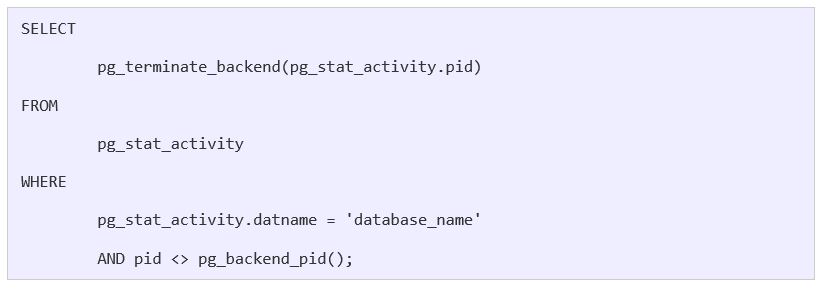
If Database can’t be deleted because of any session left open, use the following query to kill all the sessions.
Creating New Database
Creating a database is also as simple as dropping, we just need to replace drop with create.
COMMAND: CREATE DATABASE hive;
To make sure it is created, the list of databases can be accessed again.
Restoring Hive Meta-Store
To restore the Hive meta-store, we need to log in from the root user as we already placed the backup file in the home of the root user. The following command will restore the meta-store at DR-Cluster. Run this command in root user ~/hive_metastore_backups/.
COMMAND: psql -U <username>-d <Database name> -f ~/<dump-file-path>/file-name
where psql is representing that it’s a PSQL command, -U hive is the user, –d hive is the name of the database, and -f /dump-file-path/file-name is the path of the meta-store file.
Now that command is successfully completed, turn on all the hive services from Ambari UI, and then to make sure that it is restored we can go to hive and check the number of tables it is showing under one of the databases. If it is the same as in the Source cluster, then it means it is successfully restored. But it would not show any data in the tables because we haven’t moved any data, we’ve just restored the metadata of the databases in a hive (source cluster).
Synchronizing Data
So far, we have successfully replicated all the tables’ schemas and DDLs. Now we need to fetch the data from the Hadoop file system of those tables. The data of these tables is in Hadoop Distributed File System (HDFS) and we have to move this data at the same path on DR-Cluster for Hive to capture it. To move the HDFS files between servers or cluster setups we’ll be using the DISTCP command from the HDFS user of Source-Cluster.
COMMAND:
hadoop distcp hdfs://<source-ip-address>:8020/<File Path>/<File-name> hdfs://<destination-ip-address>:8020/<File Path>/<File-name>
Now if you go back to DR-Cluster and open hive and run a select query on one of the tables it would get the data. But one major problem still exists, you can’t move all HDFS/HIVE directories every time an ETL is processed so we need to capture only incremental data from source-Cluster to DR-Cluster.
To do so we will use the -update -diff parameter of the distcp command. The update parameter just copies the content of the file rather than copying the whole file and checking it with the size of the target, if the size differs it simply replaces the file on the target server with source one. The Command for DISTCP -update will be like this.
COMMAND: distcp -update hdfs://<source-ip-address>:8020/<File Path>/<File-name> hdfs://<destination-ip-address>:8020/<File Path>/<File-name>
As stated, the distcp -update command will just append new files and directories in the HDFS DR node and replace the complete file in case of a change in size. It would take the same amount of time as distcp which is time taking process. To capture only incremental data/files we will use the distcp -update -diff command. -diff parameter of the distcp command is sub parameter that can only be used with the update parameter and must have snapshot-able directories and snapshots to proceed further.
HDFS Snapshots are read-only point-in-time copies of the file system. Some common use cases of snapshots are data backup, protection against user errors, and disaster recovery and we will be using them for synchronization.
Snapshots can only be used with DISTCP -Update. It consists of snap_from and snap_to snapshots, snap_from must exist on both the source and destination cluster with the same name and snap_to must be created at the time of synchronization on the source cluster to capture the change from snap_from snapshot.
For a smooth process make sure that snap_from on the destination (DR) and snap_to on the source (PRD) are taken at the time of synchronization.
DISTCP DIFF Snapshot command:
Hadoop distcp -update -diff snap_from snap_to <source path> <destination path>
In our case, the command will be:
Hadoop distcp -update -diff snap_0 snap_1 hdfs://<source-domain>/warehouse/tablespace/ hdfs://<destination-domain>/warehouse/tablespace/
Other Help full Distcp snapshot commands are as follows.
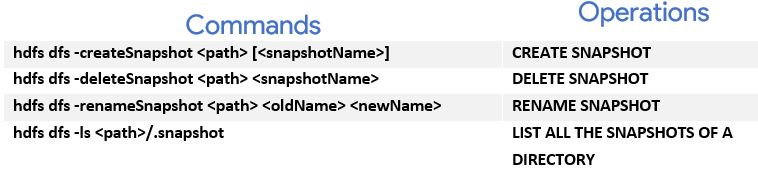
To read more about snapshots and snapshots able directories:
References for Hadoop distcp Update Snapshot:
https://hadoop.apache.org/docs/stable/hadoop-project-dist/hadoop-hdfs/HdfsSnapshots.html
https://hadoop.apache.org/docs/stable/hadoop-distcp/DistCp.html#:~:text=DistCp%20(distributed%20copy)%20is%20a,specified%20in%20the%20source%20li